Thursday, April 23, 2009

Fiesta for the Eyes

Last Tuesday night was the final night of the Fiesta Bag class at Stitched in Stone in Kingston, NH. These bags have so much personality! Take a look at the "mix" below:
From the left, we have Cheryl's thirties' bag - it looks so summery and fresh! Next, we have a woodsy, traditional mix of colors made by Donna. Next, Nancy took a chance with this bright daisy print, but it really works with the butterfly stripes. Last but not least, Susan (a new sewer) took on the Fiesta Bag with batiks! What a great combo of colors!
All of the bags are completely different, but all successful designs. Great job ladies!

Monday, April 20, 2009

Where do hungry quilters go?


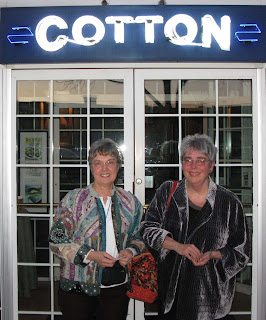
Last Friday nite I had dinner with the dynamic duo of Love in Stitches, (aka the Jersey Girls), Barbara Campell and Yolanda Fundora!
Barbara and Yolanda were in town for the Machine Quilter's Expo held in Manchester, NH. They taught two great classes based on their new book, Fuse It and Be Done. I have spent the weekend reading their book. If you have extra fabric in your stash (and who doesn't?), you will find plenty of fun ways to use it in this book. Click here to see a sampling of the projects. There are gifts, home dec, quilts, totes, and so mcuch more. I particularly like the Sunflower Door Banner (you will too!). There is so much to learn about fusibles:
  • fusible web with appliqué fusible threads and ribbons for embellishing
  • fusible fleece for stabilizing
  • fusible bias tape for stained glass work
  • fusible grid for mosaic and watercolor design
  • fusible batting for quilting
  • and so much more!
- this book is a handy technical reference for your quilting/crafting/scrapbooking library.

Yolanda Fundora is a textile designer (and fine artist and quilter and..) whose fabric designs are colorful, versatile, and hip! She writes a fabulous blog, Urban Amish where she shares insights that tie together textile and quilt design. I used her "Software" line of fabric for all of my projects in Sew and Go Totes. I was so pleased to meet her! She is releasing a new line called Sketchbook next month (manufactured by Blank Quilting) and I will be sharing my projects from this line of fabric soon!

Barbara Campbell is a talented businesswoman as well as a quilt designer and author, former magazine editor, teacher.... the list is too long! She has so much insight into the quilting world. She has written and collaborated on many books including Extreme Embellishments Denim Divas, Projects for Fiber Art Lovers, and Holiday Quilts. One of Barbara's quilts was chosen to be featured in the gallery of Irena Bluhm's book by AQS, Quilts of a Different Color.
We had a great time discussing quilting, fabrics, designs, colors! These ladies are generous and thoughtful (hey - they even put up with my kid stories..) I hope you will check out the links above.
"Where do hungry quilters go?", you ask? Cotton! (The food was delicious, by the way!)

Happy Quilting! -Kris


Thursday, April 16, 2009

Auditioning Quilts, Part 2

Back again! We were working on a simulated table runner from the last post and now I'd like to take a look at this design using some Photoshop Elements filters - this gives me a different design perspective. Here is the original:
Let's take a look at this design without color. Click on Filter>Sketch>Chalk and Charcoal. I increased the Charcoal setting to 10 and decreased the Chalk setting to 2 and here is what appeared:
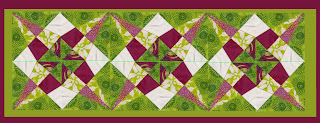
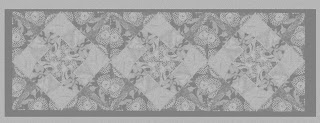
I think the squares on point really show up above; I can use that in choosing another color scheme. Next, I used the Filter>Pixellate>Crystallize. I set the cell size to 40 and the results below illustrate the spinning effect of the block.

Last, just for fun I used the Filter>Stylize>Glowing Edges and increased edge width to 3. I think this just looks cool!
What can you do with one block and Photoshop? Try it!

Sunday, April 12, 2009

Auditioning Quilts on Your Computer, Part 1

I use Photoshop Elements to view/organize photos. I also use it to audition quilts.
Photoshop Elements is the poor cousin of full blown Photoshop, however it has enough features to let you do some creative maniputlation of your photographs and scans. Here are the steps I used to audition my paper pieced block from Friday's post to audition a possible table runner on my computer:


  1. Sew one block. (Only one! Yeah!)
  2. Scan block into computer at 100 ppi.
  3. Open this scanned image using Photoshop Elements. Use the Full Edit menu.

  4. If your image needs to be rotated slightly, cleick on Image>Rotate>Custom - then rotate one degree at a time to ensure that the bottom of the block is parallel to bottom of screen.

  5. Crop the image to eliminate seam allowances - click on the crop tool and adjust the block as required.

  6. Adjust the "canvas size" to the size of the project you'd like to audition. Fore example, the block from Friday's post is 6 inches square. I would like to try a table runner that is 6 blocks by 2 blocks, so I am going to need a canvas size of 36" x 12" - at this point I am not including borders. So click on Image>Resize>Canvas Size>adjust to the desired size.

  7. To see the entire field of your design, , click on View>Fit on Screen.

  8. Click on the Marquee tool and highlight your block; go to Edit>Copy Merged; then click Edit>Paste. This will place an identical block on top of your existing block (on a new layer). You can now select this with the Move tool and move it to where you want it to go.

  9. Continue to paste in blocks as you need them. Isolate and rotate blocks by turning off layers then use the Marquee tool to select the block that you need to rotate. Click on Image>Rotate>Selection...as needed.

  10. You can merge blocks together into units as needed. Click on the layers that you want to merge as a unit. Right click in the Layers area and choose Merge Layers and you will create a unit.

  11. Select and copy units as in step 8 above.

  12. Adjust the canvas size to create borders.

  13. Create a border as follows: click on Layer>New Fill Layer>Solid Color. The color will automatically fill in with the foreground color. You can change this by cicking on it and selecting new colors.

  14. If you'd like to add another border, you can also add rectangles and color them. Here is my project:

In the next post, we'll explore some effects you can apply in Photoshop Elements to analyze your project.

Friday, April 10, 2009

Back to Color


Wednesday, we had color inspiration from Caroline's Star Path quilt. Here is my interpretationof her color use. I chose to paper piece a block, which I'd like to explore with different settings.


Tomorrow, I'll show you how I've used Photoshop Elements to simulate quilts on my computer screen.


Happy quilting! -Kris

Wednesday, April 8, 2009

Color Inspiration - Pink and Green


Is it cheating to get color inspiration from a quilt? If it is, so be it! Don't you just love the bright pinks and greens? Maybe it's the time of the year! What can you come up with using these colors as inspiration?
This is a Star Path Quilt made by a Stitched in Stone (prolific!) quilter Caroline. She changed the pattern by using a single solid light background instead of blending 4 backgrounds. This has really made the stars pop!
I hope you'll bookmark this as an inspiration for a spring project! (Stay tuned - I will post my pink and green doodle on Friday!)
Keep quilting! -Kris

Monday, April 6, 2009

Getting Crafty

Nancy's done it again! Here is Nancy Dey's twist on the Crafty Tote from Sew and Go Totes! She uses traditional fabrics in such a thoughtful way! (Check out Nancy's other interpretation of a Sew and Go Tote in this previous post.) Nancy- thanks for sharing!

Isn't it great to be a quilter these days? We have so many beautiful fabrics available! We have the internet to share our quilting adventures on and take a peek at others'. Wow - what a great time to be a quilter!

Please share your adventures with Poorhouse Quilt Designs patterns with us here - email me at info@poorhousequiltdesigns.com.

Keep quilting! -Kris

Wednesday, April 1, 2009

Quilting Stars (and Lobsters, too!)

I had the pleasure to teach at Stitched in Stone in Kingston NH on Tuesday nights during the month of March - a fun class! The students made Tidal Totes and we sure had a lot of laughs along the way! I have to show you their totes, because they really are beautiful:Clockwise from left, we have Nancy, with her starfish tote - she used the batiks with fairy frost; the fairy frost gave the bag a water effect! Next, we have Cindy - she added quilted pockets on the inside of the bag - that's a great improvement to the bag! Caroline with the gorgeous royal blue starfish tote is next, she's donating her bag to charity. Last but not least, we have Linda, with her beautifully quilted lobster! Linda has already been asked to make more by her coworkers.

Thanks ladies for a great class!


There is such a kind community of quilters at Stitched in Stone - carefully cultivated by Tammy Rommel! If you have a chance, stop by and say "hi" to Tammy and Glenn.