I use Photoshop Elements to view/organize photos. I also use it to audition quilts.
Photoshop Elements is the poor cousin of full blown Photoshop, however it has enough features to let you do some creative maniputlation of your photographs and scans. Here are the steps I used to audition my paper pieced block from Friday's post to audition a possible table runner on my computer:
- Sew one block. (Only one! Yeah!)
- Scan block into computer at 100 ppi.
- Open this scanned image using Photoshop Elements. Use the Full Edit menu.
- If your image needs to be rotated slightly, cleick on Image>Rotate>Custom - then rotate one degree at a time to ensure that the bottom of the block is parallel to bottom of screen.
- Crop the image to eliminate seam allowances - click on the crop tool and adjust the block as required.
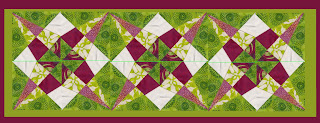
- Adjust the "canvas size" to the size of the project you'd like to audition. Fore example, the block from Friday's post is 6 inches square. I would like to try a table runner that is 6 blocks by 2 blocks, so I am going to need a canvas size of 36" x 12" - at this point I am not including borders. So click on Image>Resize>Canvas Size>adjust to the desired size.
- To see the entire field of your design, , click on View>Fit on Screen.
- Click on the Marquee tool and highlight your block; go to Edit>Copy Merged; then click Edit>Paste. This will place an identical block on top of your existing block (on a new layer). You can now select this with the Move tool and move it to where you want it to go.
- Continue to paste in blocks as you need them. Isolate and rotate blocks by turning off layers then use the Marquee tool to select the block that you need to rotate. Click on Image>Rotate>Selection...as needed.
- You can merge blocks together into units as needed. Click on the layers that you want to merge as a unit. Right click in the Layers area and choose Merge Layers and you will create a unit.
- Select and copy units as in step 8 above.
- Adjust the canvas size to create borders.
- Create a border as follows: click on Layer>New Fill Layer>Solid Color. The color will automatically fill in with the foreground color. You can change this by cicking on it and selecting new colors.
- If you'd like to add another border, you can also add rectangles and color them. Here is my project:
In the next post, we'll explore some effects you can apply in Photoshop Elements to analyze your project.
No comments:
Post a Comment