Showing posts with label Methods. Show all posts

Wednesday, November 4, 2009

“Seams” Excellent!

Piping adds dimension, personality and strength to your tote or bag seams. You can quickly create custom piping with these instructions; it’s inexpensive and adds some unexpected” pop”!

In order for your piping to easily follow seams and curves without wrinkling and twisting, you will be cutting the piping fabric on the bias (or at a 45 degree angle); find a ruler that has this angle included on it.

You will need Rayon Rat Tail Cording (2 mm) (from your local craft store) and your piping fabric. (This cording is a narrow diameter perfect for smaller accessories; piping for pillows requires a heavier, thicker cording).

Make piping:

Cut strips of the piping fabric 1” wide at a 45 degree angle. Piece strips together to make one long strip, joining at a 45 degree angle.
Place the cording in the center of strip. Wrap the bias strip around the cording, matching the edges.
Attach zipper foot*. Align the zipper foot so the edge of it is against the cording. Sew the seam allowances together to enclose the cording. The needle should be positioned as close to the cording as possible. You should now have piping with a ¼” “carrier” on the side.
*If you have a piping foot for your sewing machine, follow the manufacturer’s instructions for attaching and needle position.

How to use piping? Piping is placed between pieces in the seamline. Position piping along seamline (right side), so that the raw edges match the raw edges of seam. Sew along the seamline; place opposing piece over and follow previous stitching. If you need to sew around a curve, pin the piping in place and clip along piping raw edges – this will relieve the strain on the piping, and create the smooth curve that you want. Be careful not to cut through the original piping stitching.

Consider:
Use striped fabric for piping – after cutting on the bias, you will have diagonal stripes on the piping.
Use a mottled or small polka dot for piping – everyone will know it’s custom made!
You can add your custom piping on quilts (on right side) before you bind, then place binding at this seam for a different look.

Have fun with piping and send along pics of your results! Enjoy! -Kris

Wednesday, September 9, 2009

Fall Facts with Leaf Project

Here are some fun Fall facts that I found at http://www.lookingforadventure.com/fallfacts.htm:


Fall colors are best when late summer is dry & autumn has bright sunny days & cool nights below 40 °F.
Fall days become shorter & many plants stop making food. That is when the green chlorophyll starts to disappear from the leaves.
Most leaves fall from trees because the ends of the branch are sealed off near the leaf stem to protect the tree through the long winter months.

At left is a birch leaf (approximately 10" high) I made using my stash - I am going to make this into an art quilt/wall hanging and I will share the final product with you.

How to do this:

  1. Take a digital picture of a single leaf using your driveway or sidewalk as a contrasting background. Pick a leaf with a shape that you like - the color is not important.
  2. Load the photo into your computer and open your photo editing software. Crop close to the leaf.
  3. Resize the image to the size that you like.
  4. Print out a picture of the leaf in black and white.
  5. With a sharpie, outline then divide the leaf into different sections along natural divisions, such as the veins of the leaf. Use the different gradations of gray to determine where you will use darker and lighter colors. Number each section.
  6. Now trace each section onto paper backed fusible web, and follow the manufacturer's instructions for prepping and fusing.
  7. Zig-zag onto backing and have fun!
  8. I used ribbon floss for a stem.

Have fun with this! -Kris

Friday, July 24, 2009

Day 21 - 21 Days to Free Motion Quilting Success!

You made it! Twenty one days! Here is your last exercise:

This one is fun - write, then echo! Have fun with this last exercise and keep in mind that you are better at free motion than you were 21 days ago (OK give or take a few days!!).

I will continue to post fun free motion exercises for you - please send me links or pics of your successes! I'd love to post them!

Have a great weekend and happy quilting! -Kris

Wednesday, July 22, 2009

Day 20 - 21 Days to Free Motion Quilting Success!

There may be a song in there, but I can't find it! I wanted to demonstrate my practice piece. I started with a staff and added notes, I didn't like that. So I changed to a heavier thread - again I wasn't comfortable with the result. How about adding loops and words, without the staff? OK - that looks better but I still feel its not quite there! Time to walk away and let the idea simmer. If you want to, make some music and email me a pic!

Take it easy and keep quilting! -Kris

Tuesday, July 21, 2009

Day 19 - 21 Days to Free Motion Quilting Success!


Good morning, Quilters! This morning we have a very practical exercise for you. Can you believe it is Day 19? Remember our loop-de-loops that we did on day 6? We are going to expand on that idea. This is a great stipple that I saw in Dawn Ramirez’s Pajama Quilter Workbook. She has many ideas and I particularly love that she uses a white board to draw out her designs first – genius! You may want to check out her DVD!
So – let’s get to it! Start with a small loop and don’t stop there! Go around once more and add another larger loop! Have fun and hope you are feeling loopy!
-Kris

Monday, July 20, 2009

Day 18 - 21 Days to Free Motion Quilting Success!


Good morning, Quilters!

Wow - is it really Day 18 of this exercise? This morning we are deep sea diving and creating a seascape with shells, stars and swirls. This takes some control, but you have it! I think it would be a good idea to draw this one out on a piece of paper first. For the shell – I created the outline of the shell first, then came back and added the ridges. For the star, I created the outer then the inner star. Wouldn’t this be great on a summer placemat?

Happy Quilting-

-Kris

Saturday, June 27, 2009

Day 12 - 21 Days to Free Motion Quilting Success!

Doodle!

Good afternoon wherever you are! You've probably already come to this conclusion, but it really helps to draw out your designs before you quilt them. Here is my doodle I and the resulting quilting. Try the hearts and loops - I think you'll have fun!
Happy Quilting! -Kris


Thursday, June 25, 2009

Day 11 - 21 Days to Free Motion Quilting Success!

Good morning Quilters! Summer is a great time to attend quilt shows - they are an invaluable resource of inspiration and ideas! Research what is coming up at your vacation destination - this year we are taking the kids to Hershey/Gettysburgh area. I am taking one day to attend Quilt Oddyssey 2009 (gee....hubby and kids don't want to go)!

Our exercise today is easy and fun - we are going to make clamshells. Start with a small "hill" and build on it by increasing size and changing directions until you have a mollusk of some sort. You can build colonies of these shells by adding "hills" as you go. As you can see, they don't have to be perfect - it's just practice!
Have fun and keep quilting! -Kris


Wednesday, June 24, 2009

Day 10 - 21 Days to Free Motion Quilting Success!


Tonight's exercise is easy! This reminds me of Laverne and Shirley ("Schlemiel, schlimazel, hasenpfeffer incorporated!") - just start with a capital L and keep going. Fill up a section of your sandwich and you've practiced for the day (You're about halfway there!)!


Keep quilting! -Kris

Tuesday, June 23, 2009

Day 9 - 21 Days to Free Motion Quilting Success!

Good morning all! My sincerest apologies for not posting yesterday! My husband and I ran the 5th grade cookout yesterday, as well as attended my oldest's 8th grade promotion! When it rains, it pours!


Let's get back to free motion quilting! Before we start on a new exercise, here's a tip that I have found extremely helpful: When you need to take a break, stop with your your needle down. When you start again, stitch in the same place and then keep going. In the past, I tried to move right away from my stopping point, but that would result in long uneven stitches at that point. But now, I take a few stitches in place and then get going again and this seems to have eliminated the problem. Try it!


Today we'll work on a shape that is so versatile: leaves! We'll be sewing these along in row, but they are easy to do in a meanering fashion also. So, let's get started!

Do this vertically to start.

Make one leaf shape, going up one side and down the other.

Add one vein in the middle.

Travel down from here and add a leaf out to the right and add a vein, then repeat to the alternating left and right.

You have a leafy vine! I find this is a nice border treatment. You can expand this by using more intricate shapes for your leaves and adding more veins. The choices are endless!

Happy quilting! -Kris


Friday, June 19, 2009

Day 8 - 21 Days to Free Motion Quilting Success!


I think the moon is in the 7th house.....today we are taking an easy shape (peace sign, dudes) and incorporating it into a stipple. I think this would be groovy scattered (sparsely) on a teen quilt!
Tip: If you are going to put identical shapes into a stipple (ex: stars, snowflakes, hearts...), practice on a throw away sandwich and determine a repetitive process. For the peace signs, I made a circle perpendicular to where I was in the stipple, from the top, I came straight down, added 2 bird legs, then up and out the top. I did this for every one.
Peace out quilters! Have a great weekend and day 9 begins on Monday! -Kris

Thursday, June 18, 2009

Day 7 - 21 Days to Free Motion Quilting Success!

Good morning! Today's exercise is quick and easy - let's try "weaving". Start with a few vertical "hills" then add horizontal "hills", repeat until you have a row of a size you like, then maneuver to the next row. Your hills should be of a somewhat consistent size to achieve the basketweave.
Tip: Try this on paper before you quilt. Have fun! Smile! Keep quilting! -Kris

Wednesday, June 17, 2009

Day 6 - 21 Days to Free Motion Quilting Success!

Good morning - Hope you are ready to get sewing!

We are going to get loopy again today. Stipple as you did yesterday, but intermittently add loops. If you add loops consistently, it'll look great. This is a good fill in baby quilts. Make an entier loopy sample sandwich and let me know if you like this stipple. You can also add hearts instead of loops, if you dare!!

Just a word on starts and stops. I like to keep my needle in the same position and first pull my thread to the top, then gradually increase stitch length for my starts and reverse that for my stops. I don't like to try to reverse, as I think it creates a "bobble" at these points. See what you like for starting and stopping.
Check this out: Here is a general website for quilting - check out Diane's tips -- she's one of the great machine quilters!
Have a quilty day! -Kris

Tuesday, June 16, 2009

Day 5 - 21 Days to Free Motion Quilting Success!

By now, you must be thinking "Let's just stipple already!!". I'd like you to start today with a fresh quilt sandwich (8" square is fine). As you can see from the grainy photos, I'd like you to get a feel for making lumpy stipply (is that a word?) shapes. So, instead of trying to make the familiar puzzle shape pieces, let's start with smooth round "hills" randomly placed around each other. So:

  • Look at the photo top left and start with making hills in the middle of your sandwich.

  • Without rotating your sandwich, follow around your "hills", with more "hills"(top right)

  • Continue around and around your sandwich with these "hills" until it is completely filled (bottom right then bottom left).

Your sample may look like a frilly flower. Again, don't worry too much right now about spacing between hills but instead, try for smooth, consistent motion. Also take a look at what you've done to determine if you need to slow down or speed up your hands (see Day 4).

Tip: I hold my hands about 6" apart and they act as a frame to my work. I complete the work "inside" my hands, stop (needle down), reposition, and start again.

Here is a list of my all-time favorite Machine Quilting Books (they may be at your library):


  • Machine Quilting: A Primer of Techniques by Sue Nickels (pub by American Quilters Society)

  • Guide to Machine Quilting by Diane Gaudynski (pub by American Quilters Society)

  • Easy Machine Quilting edited by Jane Townswick (pub by Rodale Press)


Enjoy the process!! Keep Quilting!


-Kris


Monday, June 15, 2009

Day 4 - 21 Days to Free Motion Quilting Success!


I'm baaaaack! Let's try something a little more challenging today! Today, we'll make some waves. Start on the left, go smoothly up and over the wave, then come back and scoop under. Let's make a multitude of waves, some rows to the right, then switch to rows going to the left (I started on the right for these rows). I am right-handed - I felt more control when traveling to the right.

This time, try to look for consistent stitch length - adjust your speed as you go along. If you find your stitch length is too long, you may need to run your machine faster. If you find that your stitches are too small, move your hands faster. Consistent stitch length takes time to achieve - practice and you'll be rewarded!!

Don't forget to:
  • Drop your feed dogs.
  • Reduce top tension slightly to start.
  • Thread your machine with good quality thread.
  • Install a new needle (let's use a Universal 80/12 needle to start).
  • With your practice quilt sandwich under the presser foot, lower the needle and raise it to bring bobbin thread to the top of the sandwich. As you start sewing, hold onto both threads to start.

Smile and keep quilting!


-Kris

Friday, June 12, 2009

Day 3 - 21 Days to Free Motion Quilting Success!

Here we go Loop - di - loop! Let's just enjoy the process today~
give yourself permission to make loops - here are the rules:
  • No particular size;
  • No required direction;
  • Keep your motion smooth;
  • Turn on some great music;
  • Smile!

Try fill in at least 1/4 of your quilt sandwich! If you have a quilt sandwich that you'd like to share, send me a photo and I'd love to!

Our adventure resumes next Monday!

Keep Quilting! -Kris

Tuesday, June 9, 2009

Day 1 - 21 Days to Free Motion Quilting Success!

Join us as we embark on an adventure that I've named "21 Days to Free Motion Quilting Success"!

Anyone can free motion quilt - it does takes practice - that's what we will be doing for the next 21 days! I have put together 21 exercises that will start you on your way to stippling and other fun free motion options! You can follow along and do each exercise on the day that it's posted, or you may want to practice at your own pace. You will find these lessons (titled Day # - 21 Days to Free Motion Quilting Success) under "Topics" on the left sidebar of this blog under Free Motion.

Let's get started:
  1. Prepare a 12" x 12" quilt sandwich (front, batting, backing secured with either basting spray or safety pins.
  2. Put your free motion foot on your sewing machine (consult your manual if you aren't sure which foot you should use).
  3. Drop your feed dogs.
  4. Reduce top tension slightly to start.
  5. Thread your machine with good quality thread.
  6. Install a new needle (let's use a Universal 80/12 needle to start).
  7. With your practice quilt sandwich under the presser foot, lower the needle and raise it to bring bobbin thread to the top of the sandwich. As you start sewing, hold onto both threads to start.

Here is your first assignment: Make rows of small (approximately 1/2" high) "hills and valleys" as shown on the right. The sample does not have to be beautiful (see my sample - definitely not perfect!). This exercise puts you in control of the machine and allows you to experience the feeling of free motion! Allow yourself to fill in approximately 1/4 of your quilt sandwich. Leave the rest of your sanwich for tomorrow! Tomorrow we will start looking at stitch quality and consistency.

-Keep quilting!

-Kris Poor

Thursday, April 16, 2009

Auditioning Quilts, Part 2

Back again! We were working on a simulated table runner from the last post and now I'd like to take a look at this design using some Photoshop Elements filters - this gives me a different design perspective. Here is the original:
Let's take a look at this design without color. Click on Filter>Sketch>Chalk and Charcoal. I increased the Charcoal setting to 10 and decreased the Chalk setting to 2 and here is what appeared:
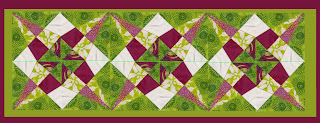
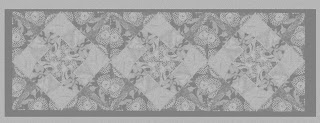
I think the squares on point really show up above; I can use that in choosing another color scheme. Next, I used the Filter>Pixellate>Crystallize. I set the cell size to 40 and the results below illustrate the spinning effect of the block.

Last, just for fun I used the Filter>Stylize>Glowing Edges and increased edge width to 3. I think this just looks cool!
What can you do with one block and Photoshop? Try it!

Sunday, April 12, 2009

Auditioning Quilts on Your Computer, Part 1

I use Photoshop Elements to view/organize photos. I also use it to audition quilts.
Photoshop Elements is the poor cousin of full blown Photoshop, however it has enough features to let you do some creative maniputlation of your photographs and scans. Here are the steps I used to audition my paper pieced block from Friday's post to audition a possible table runner on my computer:


  1. Sew one block. (Only one! Yeah!)
  2. Scan block into computer at 100 ppi.
  3. Open this scanned image using Photoshop Elements. Use the Full Edit menu.

  4. If your image needs to be rotated slightly, cleick on Image>Rotate>Custom - then rotate one degree at a time to ensure that the bottom of the block is parallel to bottom of screen.

  5. Crop the image to eliminate seam allowances - click on the crop tool and adjust the block as required.

  6. Adjust the "canvas size" to the size of the project you'd like to audition. Fore example, the block from Friday's post is 6 inches square. I would like to try a table runner that is 6 blocks by 2 blocks, so I am going to need a canvas size of 36" x 12" - at this point I am not including borders. So click on Image>Resize>Canvas Size>adjust to the desired size.

  7. To see the entire field of your design, , click on View>Fit on Screen.

  8. Click on the Marquee tool and highlight your block; go to Edit>Copy Merged; then click Edit>Paste. This will place an identical block on top of your existing block (on a new layer). You can now select this with the Move tool and move it to where you want it to go.

  9. Continue to paste in blocks as you need them. Isolate and rotate blocks by turning off layers then use the Marquee tool to select the block that you need to rotate. Click on Image>Rotate>Selection...as needed.

  10. You can merge blocks together into units as needed. Click on the layers that you want to merge as a unit. Right click in the Layers area and choose Merge Layers and you will create a unit.

  11. Select and copy units as in step 8 above.

  12. Adjust the canvas size to create borders.

  13. Create a border as follows: click on Layer>New Fill Layer>Solid Color. The color will automatically fill in with the foreground color. You can change this by cicking on it and selecting new colors.

  14. If you'd like to add another border, you can also add rectangles and color them. Here is my project:

In the next post, we'll explore some effects you can apply in Photoshop Elements to analyze your project.

Tuesday, March 24, 2009

Purse Strings


Today I am finishing a bag for Spring Quilt Market which will be part of a display for Blank Quilting. It's the "Mini Bag" from my new book, Sew and Go Totes. I needed an alternative to the 1/4" braided cord used for the strap. I decided to create a strap for the bag using pet screen.

I have a hard time finding "strap" materials that I like - so let's create our own!
Note: I cut the pet screen along it's length as it lays flatter in this direction.


You will need:

1" wide piece of black pet screen at the required length
1 1/2" wide piece of accent fabric at the required length


1. Fold outer (long) edges of pet screen in to meet at center and zigzag down the middle - this will create a 1/2" base for the accent fabric to "sit on". (Luckily, my walking foot is marked on either side with 1/4" mark, so that it is a visual guide for the 1/2" wide strip!)


2. Fold accent fabric in half lengthwise and press. Open out accent fabric and press outer raw edges to the fold; then fold in half again (you have now encased those raw edges).

3. Using your walking foot, top stitch the accent fabric to the pet screen strap, making sure that the "raw edges" of the pet screen are hidden behind fabric accent. Voila! This is what I ended up with - a strong 1/2" wide strap!